
Until now, your website has been a design. In this chapter, Claude Code turns it into a real website, adds the parts that bring in customers, and puts a test version online. You won’t write any code: you describe what you want, Claude Code builds it, and you check the result.
What you’ll have at the end
Your real, working website, online at a test address you can open on any phone and share with anyone.
What you’ll do in this chapter
Building your website takes five steps, in this order.
- 5.1Hand over your designAbout 45 minutes, mostly waitingYou give Claude Code your approved design, your images and your logo, and it builds every page in one go.
- 5.2Set up Netlify and preview on your phoneAbout 15 minutesNetlify keeps your website online. You set it up and publish a free preview of your website, because seeing it on a real phone is the only way to know how it behaves there.
- 5.3Review and refineAbout 1 hourYou click through the built website, on your computer and your phone, and fix what isn’t right yet. Because the design is already approved, this is about details, not big decisions.
- 5.4Add forms, bookings and contact buttonsAbout 30 minutesThe parts that turn visitors into customers: forms that keep spam out, online booking, and buttons to call or message you with one tap.
- 5.5Publish your website and test itAbout 30 minutesYour website at its free Netlify address, tested on real phones before anyone else sees it.
What you need
- If you take bookings: a booking tool (compared in 5.4)
- If you want a WhatsApp button: the free WhatsApp Business app on your phone
- For testing: a second phone of another make, such as an iPhone and an Android, and a friend or customer who hasn’t seen your website yet
5.1Hand over your design
About 45 minutes, mostly waiting
What this is for
Claude Code is the part of Claude that builds. It works on the files in a folder on your computer, the way a developer would, and shows you the result in a browser inside the app. In this section, you download your approved design as files, put them in a folder with your images and logo, and open that folder in Claude Code. Then it builds your whole website in one go.
By the end of this section, you have a first working version of every page, on your own computer.
Know-how
How Claude Code works
- Your website is a folder. A website is a set of files: one for each page, one with your colors and fonts, and your images. Claude Code creates them in a folder you choose, using Astro, a free tool that turns those files into a fast website. The files are yours, so you can back them up or move them to another host at any time.
- You see the result in the app. Claude Code opens your website in a browser pane next to the conversation. It also uses that pane to check its own work.
- It asks before it acts. The permission mode sets how often. Choose Accept edits: Claude Code then changes your website files without asking, but asks before it runs a command, such as installing a tool. Read its short explanation. If it matches what you asked for, allow it.
- It saves versions. Claude Code can save a version of your website after every change, with a tool called Git. You never have to use Git yourself. Say “Save this version”, or “Go back to the version from before I changed the menu”.
- Building uses more of your Claude usage than chatting. Check your usage before a long session, as in 2.3. If you reach a limit, the work pauses until it resets. Nothing is lost.
Step by step
- Download your design as files. Open the conversation with your approved design and ask Claude Design: “Export this design as files for a handover to Claude Code, which will build the real website from them. Put all pages, styles, images and fonts in one zip file.” Download the zip file.
- Create a folder for your website. In your Documents folder, create a folder named after your website, such as “studio-luna-website”. Unzip your design files into it, and copy in your website images folder and your logo kit.
- Open Claude Code in that folder. In the Claude desktop app, click Code at the top. Under the message box, click the folder control, choose Open folder… and select your website folder. Next to it, set the permission mode to Accept edits.
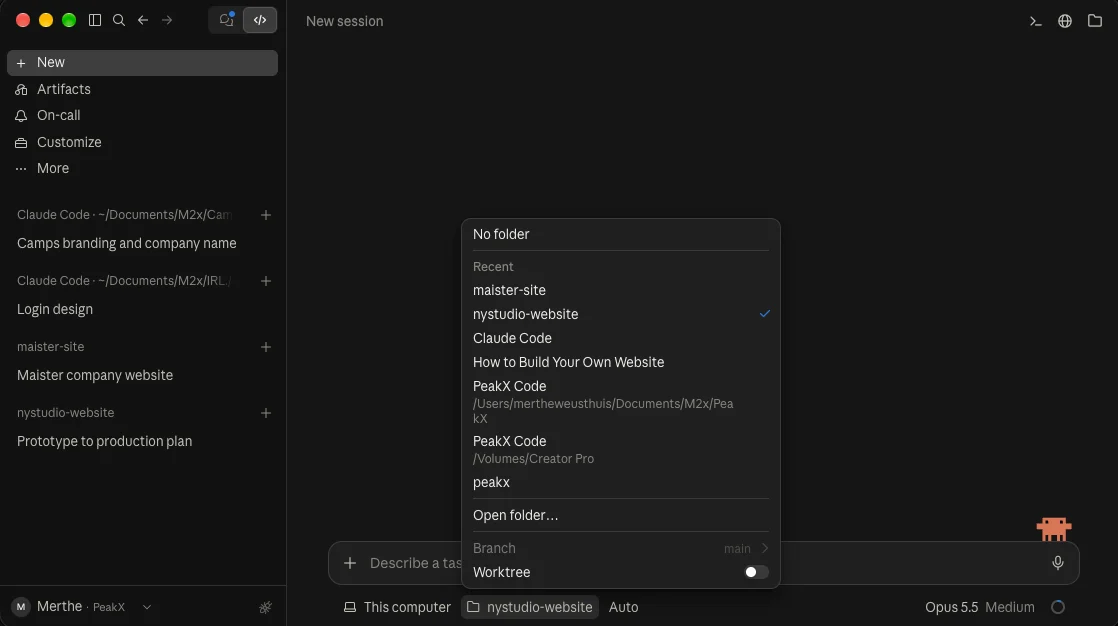
The folder control under the message box. Choose Open folder… the first time; after that, your website folder appears under Recent. - Ask Claude Code to build your website. Send prompt P15.
Copy-paste prompt P15
Build my website
What this prompt does: Claude Code builds every page of your website from your design, makes it fast, keeps your details easy to change, and checks its own work.
This folder contains the design of my website, exported from
Claude Design, plus my images and logo files. Build my real
website from this design, in this folder.

1. Build it with Astro, so it is fast, easy to host on
Netlify and easy to change later. Install anything it needs,
such as Node.js, and explain each installation to me in one
plain sentence before you run it.
2. Match the design exactly: layout, colors, fonts, spacing
and text. Build it mobile-first, and make it work on every
screen size.
3. Use the images in my images folder and the logo files in
my logo kit. Let Astro resize and compress every image, and
load images lower on the page only when a visitor scrolls to
them.
4. Build parts that appear on several pages, such as the
menu and footer, only once. Keep details that change often,
such as prices, opening hours and contact details, in one
file, so I can update them easily later.
5. Add a description to every image for people who can't see
it, and a title and short description to every page for
Google.
6. Create a file called CLAUDE.md with notes on this
project: my business, the pages, the design rules and where
everything is. Update it after every bigger change.
7. Use Git to save a version after every change I approve,
with a short description.
8. If something in the design is unclear, make a sensible
choice and tell me what you chose.
9. When you are done, check every page at phone and computer
size in the browser pane, and fix anything that doesn't
match the design. Then tell me what you built, and anything
you couldn't do.
- Let it build, and answer its questions. This takes a while, so leave the app open. Along the way, Claude Code may need your input. It may ask to install something it needs, for example to show the Arabic version of your website correctly, or ask how you want something built when the design leaves it open. Allow installations that match what you asked for, and answer questions in your own words. If you’re not sure, ask it to explain the options and recommend one.
- Look at the result. When Claude Code is done, your website opens in the browser pane. If it doesn’t, click Browser at the top of the session. It won’t be perfect yet. That is the next section.
5.2Set up Netlify and preview on your phone
About 15 minutes
What this is for
Netlify is your host: the service that keeps your website online. Claude Code’s browser pane shows your website at phone width, but not how it behaves on a real phone: tapping, scrolling, the way Safari’s bars change the screen, or how fast it loads over a mobile connection. For that, your website has to be online.
In this section, you create your Netlify account and Claude Code publishes your first preview. By the end of this section, you have a preview link to your website that opens on any phone.
Know-how
Preview or publish
Netlify has two ways to put your website online.
- A preview is a private test link that only people you send it to will find. Previews are free and unlimited, so use one every time you want to check your website on a phone.
- Publishing puts the live version of your website on its permanent Netlify address, such as studio-luna.netlify.app. In chapter 6, your own domain will point to that address. On the free plan, each publish uses 15 of your 300 monthly credits, so about 20 a month. You publish in 5.5, once your website is finished.
Step by step
- Create a Netlify account. Go to netlify.com, click Sign up, use your business email and choose the free plan.
- Publish your first preview. Send prompt P16. The first time, a Netlify page opens in your browser: click Authorize to let Claude Code publish to your account. If Claude Code asks which Netlify team to use, or for another name because yours is taken, answer and let it continue. When it gives you the preview link, you are ready for 5.3. The prompt also sets rules in your project notes, so Claude Code never uses your credits without asking, in this conversation or any later one.
Copy-paste prompt P16
Set up Netlify and publish a preview
What this prompt does: Claude Code creates your Netlify project and publishes a free preview, and from now on only publishes your live website when you say so.
Create a Netlify project called [YOUR WEBSITE NAME] for my
website, using the Netlify command-line tool. If I need to
sign in to Netlify, tell me what to do. Then publish a
preview, not the live version, and give me the preview link.

Then add these rules for Netlify to the project notes in
CLAUDE.md, and follow them from now on, in every
conversation:
1. Never publish the live version of my website unless I
clearly ask you to.
2. When I want to check something on my phone, publish a
preview and give me the link.
3. Before you publish the live version, list the changes
since the last publish and ask me to confirm.
4. If you are not sure whether I mean a preview or the live
version, ask.
Warning
Publish in batches. If you run out of Netlify credits, Netlify takes your website offline until the next month starts: first its Netlify address, and once you have connected it in chapter 6, your own domain too. Check every change with a free preview, and publish several fixes at once.
5.3Review and refine
About 1 hour
What this is for
The first build is usually close, but rarely exact: a gap that is too wide, a button that goes nowhere, an image cropped in the wrong place. In this section, you go through every page, on your computer and on your phone, and fix what isn’t right yet, and you learn what to do when something goes wrong.
By the end of this section, every page works and matches your design, on phone and computer.
Step by step
- Click through every page. In the browser pane, click every menu item, button and link. Compare each page with your design in Claude Design.
- Check it on your phone. Ask Claude Code to publish a new preview, and open the link on your phone. Tap through every page: the menu, every button, and anything that opens, scrolls or moves. Open every dropdown and date picker and make a choice. Most of your visitors will see this version.
- Describe what isn’t right. Say what you see, where, and what you expect instead, as in 4.3. For example: “On the phone version of the homepage, the Book now button covers the photo. Put it below the photo.” Send small, related fixes together in one message. Ask for bigger changes one at a time, and check each before the next.
- Check your effects. If your design has motion, video or 3D from 4.2, check that it works and doesn’t make the page slow or jumpy, especially on the phone version.
- Check your languages and dark mode, if you have them. Ask a native speaker to read each language version. For Arabic, check that every page reads from right to left. For dark mode, check every page in both modes.
- Save a version after each round. When a round of fixes looks right in a new preview on your phone, say “Save this version.”
When something goes wrong
Sooner or later, something will. Claude Code can fix almost anything you can describe, and a saved version means you can always go back.
5.4Add forms, bookings and contact buttons
About 30 minutes
What this is for
These are the parts of your website that bring in customers. In this section, you add the ones your page plan from 4.1 asks for. This section has three parts:
- Part 1: Your forms, if you have any. The forms from your design, such as a contact, quote or sign-up form, made to send what visitors fill in to your inbox, with spam kept out.
- Part 2: Online booking, if you take bookings. A booking tool on your website, so visitors can book an appointment themselves.
- Part 3: Contact buttons, if your page plan has them. Buttons to message you on WhatsApp or call you with one tap, and a map.
Skip any part your website doesn’t need. You test all of them in 5.5, once your website is published.
Part 1Your forms, if you have any
If your design has forms, such as a contact form, a quote request or a newsletter sign-up, they don’t send anything yet. Netlify, your host from 5.2, can receive what visitors fill in and email it to you, at no extra cost. It also filters out spam: every message goes through a spam filter, and a hidden field in each form catches most automated spam, because spam programs fill in every field they find.
Warning
Don’t ask for sensitive information in a form. What visitors fill in arrives as an ordinary email and is stored in your Netlify account, which isn’t built to protect sensitive data. Privacy law also treats some information much more strictly. Never ask for:
- Health or medical details, such as symptoms, conditions or medication
- ID, passport or social security numbers
- Payment details, such as card or bank account numbers
- Passwords
- Details about someone’s religion, ethnicity, sexual orientation or political views
Ask only for what you need to get back to someone: a name, an email address or phone number, and a short message. Collect anything sensitive in person, or with a tool made for it, such as the client software of your clinic or a payment service like Stripe.
Step by step
- Make your forms work. Send prompt P17 with your details filled in.
Copy-paste prompt P17
Make my forms work
What this prompt does: Claude Code connects every form in your design to Netlify, so what visitors send reaches you and spam stays out.
Make every form on my website work with Netlify Forms.

1. Keep each form exactly as designed.
2. Give each form a clear name, such as Contact or Quote
request, so I can tell them apart in Netlify.
3. Add a hidden honeypot field to each form to keep out
spam.
4. After sending, show the thank-you message from the
design. If there isn't one, add one that matches the design
and says when I will reply: [FOR EXAMPLE: WITHIN ONE WORKING
DAY].
5. Show a clear message when a required field is missing or
filled in wrongly.
- Save this version. You test your forms in 5.5, once your website is published.
If spam still gets through after you go live, ask Claude Code to add Netlify’s built-in reCAPTCHA, the “I’m not a robot” check.
Part 2Online booking, if you take bookings
A booking tool takes care of your calendar, confirmations and reminders. Your website shows its booking page, either inside one of your pages or behind every Book button.
Step by step
- Set up your booking tool. Create an account, add your services with their length and price, set your available hours, and connect the calendar you already use.
- Copy your booking link. Every booking tool gives you a link to your booking page. You find it in its sharing or website settings.
- Add it to your website. Ask Claude Code, for example: “Add my booking page to the website. Here is my booking link: [YOUR LINK]. Show it on the Book page, and make every Book button go there.”
Part 3Contact buttons, if your page plan has them
On a phone, one tap to call or message is often what turns a visitor into a customer.
Step by step
- Set up WhatsApp Business, if you want a WhatsApp button. Install the free WhatsApp Business app on your phone and register your business number.
- Ask Claude Code to add your buttons. For example: “Add a WhatsApp button that opens a chat with [YOUR NUMBER, WITH COUNTRY CODE], with the message ‘Hi, I’d like to book an appointment’, and a call button for [YOUR NUMBER]. On phones, keep them visible at the bottom of the screen. Add a map of [YOUR ADDRESS] to the Contact page.”
- Save this version.
Tip
Make it quick to get in touch. Speed is a big part of turning visitors into customers. The longer it takes someone to reach you, the more likely they are to move on to the next business. A WhatsApp button lets people ask their question in a few seconds, in an app they already use every day, without filling in a form, making a call or writing an email. If your customers use WhatsApp, make it your main way to get in touch, and reply quickly.
5.5Publish your website and test it
About 30 minutes
What this is for
So far, you have only shared previews. In this section, you publish your website at its free Netlify address, such as studio-luna.netlify.app, and test everything on real phones before anyone else sees it. Your own domain comes in chapter 6.
By the end of this section, your website is online, tested, and ready to go live.
Step by step
- Publish your website. Ask Claude Code: “Publish my website to Netlify as the live version. Give me the address when it’s live.”
- Get your form messages by email, if you have forms. In Netlify, open your project and go to Project configuration, then Notifications. Under form submission notifications, add an email notification to your business email address, so messages arrive where you will answer them.
- Test everything. Open your test address on your phone and computer, and tick off every point.
- Every page opens on your phone and your computer.
- It works in at least two browsers, such as Safari and Chrome.
- Every menu item, button and link goes to the right place.
- Every dropdown, date picker and other control works by touch: it opens, scrolls and lets you choose.
- If you have forms: a test message from each form arrives in your business inbox. If it doesn’t, check your spam folder. If it isn’t there either, send an email from your personal address to your business address, to check that your business email receives email at all.
- If you take bookings: a test booking goes through, and the confirmation arrives.
- If you have WhatsApp or call buttons: they open the right number.
- Your homepage scores 90 or more for mobile on PageSpeed Insights, Google’s free speed test. If it doesn’t, paste the suggestions into Claude Code.
- A friend or customer completes your main action, such as booking or sending a message, on their own phone without your help.
- Fix and publish again. Collect everything you found, ask Claude Code to fix it, check the fixes in a preview on your phone, then publish once.
Your website exists. Not as a design or a plan, but as a real website you can open on any phone, with forms, booking and buttons that work. You built it without writing a line of code.
In chapter 6, you connect your own domain and go live.
It’s real now!
Sources, checked October 2026. Claude Code in the desktop app: Claude Code docs. Netlify plans and credits: netlify.com/pricing. Netlify credits, previews and forms: Netlify docs. Netlify spam filters: Netlify docs. Booking tools: Calendly, Cal.com and Fresha.