
Your website works. In this chapter, you make sure your email reaches inboxes, add the details that make your website look finished wherever it appears, put the legal pages in place, check everything one last time, and move your website to your own domain. It is the shortest chapter in the guide, and probably the most satisfying one.
What you’ll have at the end
Your website, live on your own domain: the address you can finally print on your business cards.
What you’ll do in this chapter
Going live takes five steps, in this order. Your email comes first, because one of its settings takes a few days. Connecting your domain comes last, because the moment it is connected, your website is live.
- 6.1Make your email reliable5 minutes to check, about 30 more if a record is missingA few settings that keep your emails out of spam folders and stop others from sending email in your name. Often they are already in place, and a quick look at your domain settings tells you. If not, one of them needs a few days, so you start here.
- 6.2Add the finishing touchesAbout 30 minutesThe icon in the browser tab, the image people see when you share a link, and a friendly page for addresses that don’t exist.
- 6.3Add your legal pagesAbout 30 minutesA privacy policy, a cookie banner if you need one, and anything your country requires. Most websites need less than people fear, but almost every website needs something.
- 6.4Final checksAbout 20 minutesOne last round through a checklist, then you publish the finished version.
- 6.5Connect your domain and go liveAbout 30 minutes, plus up to a day of waitingTwo settings at your domain provider, and your website is on your own address.
What you need
- Your sign-in details for Squarespace and Google Workspace
- Your business details: name, address, contact email, and registration number if you have one
- The country where your business is registered, and where most of your customers are
- If you are replacing a website: the addresses of its pages
- Some waiting time: up to a day for your domain, and a few days if you need to set up DKIM
6.1Make your email reliable
5 minutes to check, about 30 more if a record is missing
What this is for
Your email address has worked since 2.2. But without a few settings, email you send from it is more likely to land in spam folders, and anyone could send email that pretends to come from you. Gmail and Yahoo check for these settings on every email they receive. Setting them up now, before customers start writing to you, means your replies reach them.
Often Google has already set everything up for you, and a quick look at your domain settings tells you. If something is missing, one of the settings can need a few days before Google lets you finish it. That is why this section comes first: you work on the rest of the chapter in the meantime.
The settings are records in your domain’s DNS settings, the same place you connect your website in 6.5. Only one of them is strictly needed to receive email, and Google usually sets it up for you. The others make your email more trusted: two are worth doing, and one is optional. By the end of this section, your email has the records it needs, and you have checked that it arrives in the inbox.
If your email runs on another service than Google Workspace, such as Microsoft 365 or Zoho, the same records apply, with that service’s values. Its help pages list them.
Know-how
What DNS is
When someone types studioluna.com, their computer doesn’t know where your website lives. It looks your domain up in DNS, the internet’s address book, and finds the address of the server that holds your website. The same happens when someone sends you an email: DNS tells their email service where to deliver it.
Your domain provider, Squarespace if you bought your domain with Google Workspace, keeps your entry in that address book. The entry is made up of records. Each record has a type, which says what kind of record it is, a name, which says which address it is for (@ means your domain itself), and data, which says where to go. You only need six:
Changes take a while to reach every computer in the world: usually less than an hour, sometimes up to a day. Until then, some people still see the old situation, which is normal.
Step by step
- Open your domain settings. If you bought your domain with Google Workspace, Squarespace manages it:
- Go to account.squarespace.com/domains and sign in with your business email address. If Squarespace offers Continue with Google, try that first. If it doesn’t work, type your business email address and use Forgot password to set a password.
- Click your domain, then DNS in the side panel, then DNS Settings.
If you can’t sign in, go to admin.google.com instead, open the menu and click Account, Domains and Manage domains. Next to your domain, click View details, then Advanced DNS settings: Google shows your sign-in details and a link to Squarespace. If your domain is with another provider, sign in there and open its DNS settings instead.
- Check which email records are there. Look for these three records. If Google set up your email for you, they sit together in a group, often called Domain Connect to Entri or Google Workspace:
- An MX record with the data
smtp.google.com - A TXT record with the name
@whose data starts withv=spf1 include:_spf.google.com: your SPF record - A TXT record with the name
google._domainkeywhose data starts withv=DKIM1: your DKIM record
If all three are there, your email is set up: skip the rest of this section and go to 6.2. You may also see a group called Email Security with more SPF and DMARC records. Leave it as it is: Squarespace combines it with Google’s records.
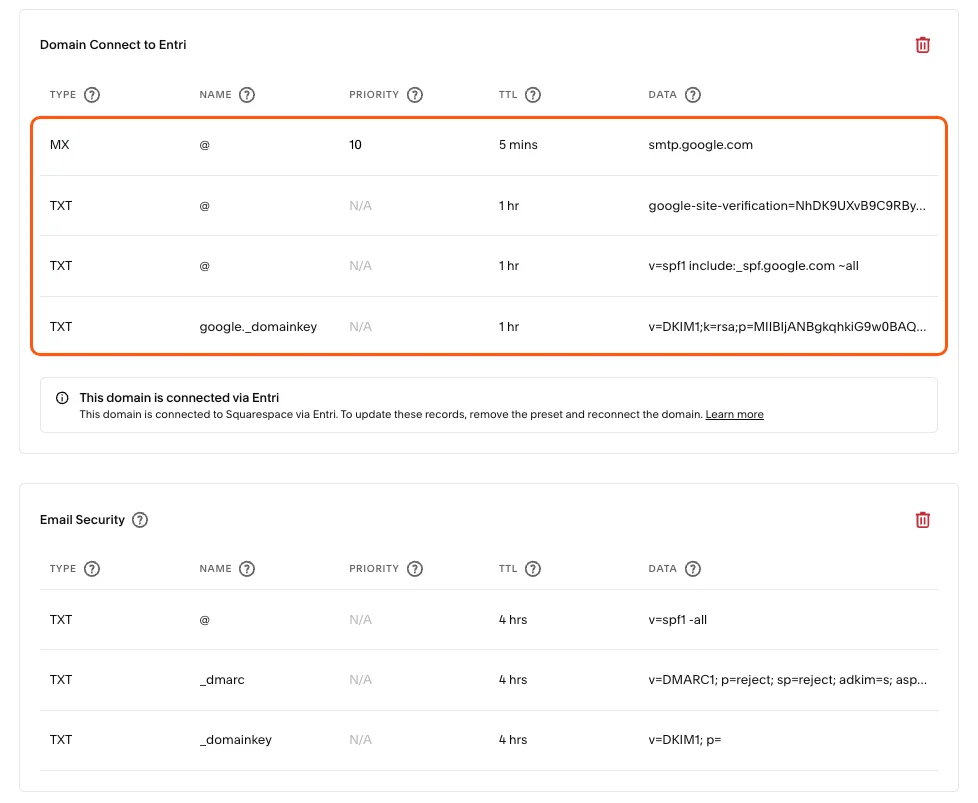
Email set up by Google: the MX, SPF and DKIM records (highlighted), with Google’s ownership check among them. The Email Security group below is added by Squarespace. Leave both groups alone. If one of the three is missing, do only the steps below for that record.
- An MX record with the data
- If a record is missing, open the form to add one. Scroll down to Custom records and click Add record. The first time, Squarespace asks you to confirm it’s you: enter the verification code it sends you, usually by email, and click Continue. Then choose the type, fill in the name and the data, leave priority and TTL as they are unless a step says otherwise, and click Save.
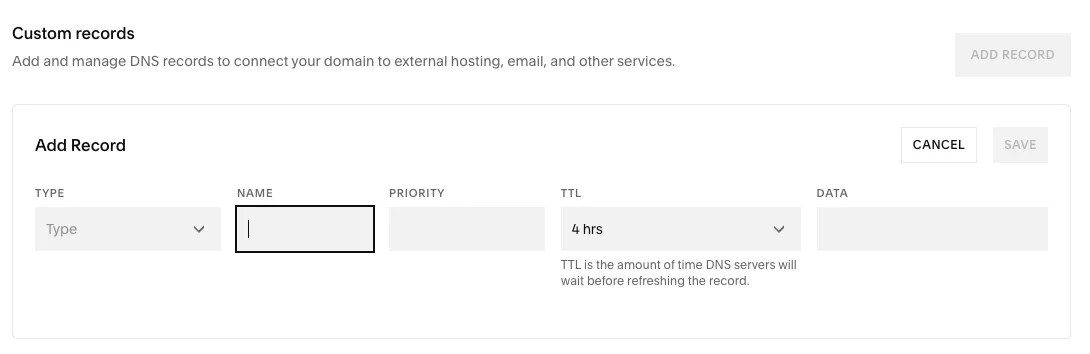
The form that opens when you click Add record. The fields change slightly with the type you choose. - If the MX record is missing, add it. Add a record: type MX, name
@, priority1, datasmtp.google.com. - If the SPF record is missing, add it. Add a record: type TXT, name
@, datav=spf1 include:_spf.google.com ~all. If you have an Email Security group whose SPF record says onlyv=spf1 -all, delete that group first, with the trash can next to its name. It is meant for domains that don’t send email, and it would block yours. - If the DKIM record is missing, create it. Go to admin.google.com, open the menu, then click Apps, Google Workspace and Gmail. Click Authenticate email.
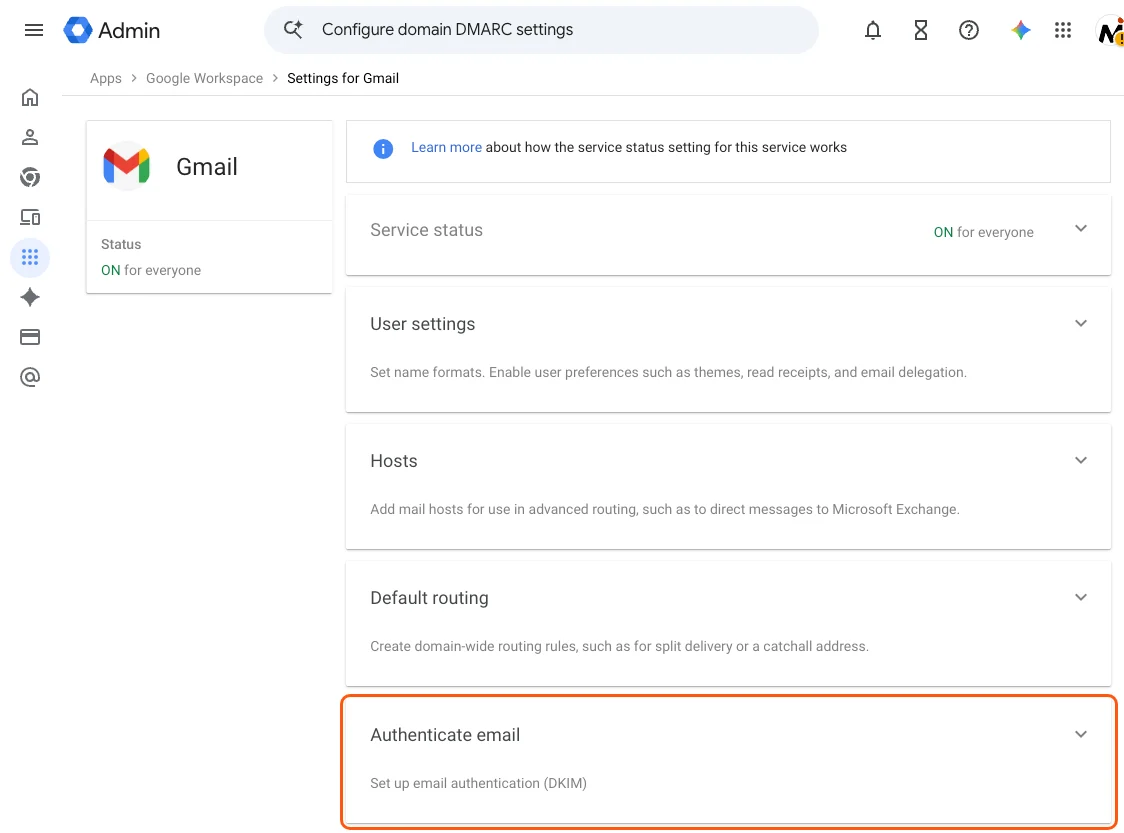
Settings for Gmail in the Google Admin console. Click Authenticate email (highlighted). Click Generate new record, then Generate. Google shows a host name and a long value. If you get an error, your email is too new: Google needs one to three days after setup. Carry on with 6.2, and come back to this step later.
- Add it to your domain. In your Squarespace DNS settings, add a record of type TXT. Use the host name Google showed you as the name, and the long value as the data.
- Turn on DKIM. Wait a few hours, then go back to Authenticate email in Google and click Start authentication. If Google says it can’t find the record yet, carry on with 6.2 and try again the next day. Once it works, the status says Authenticating email with DKIM. Google keeps showing the record and the line “You must update the DNS records”, but you don’t need to do anything more.
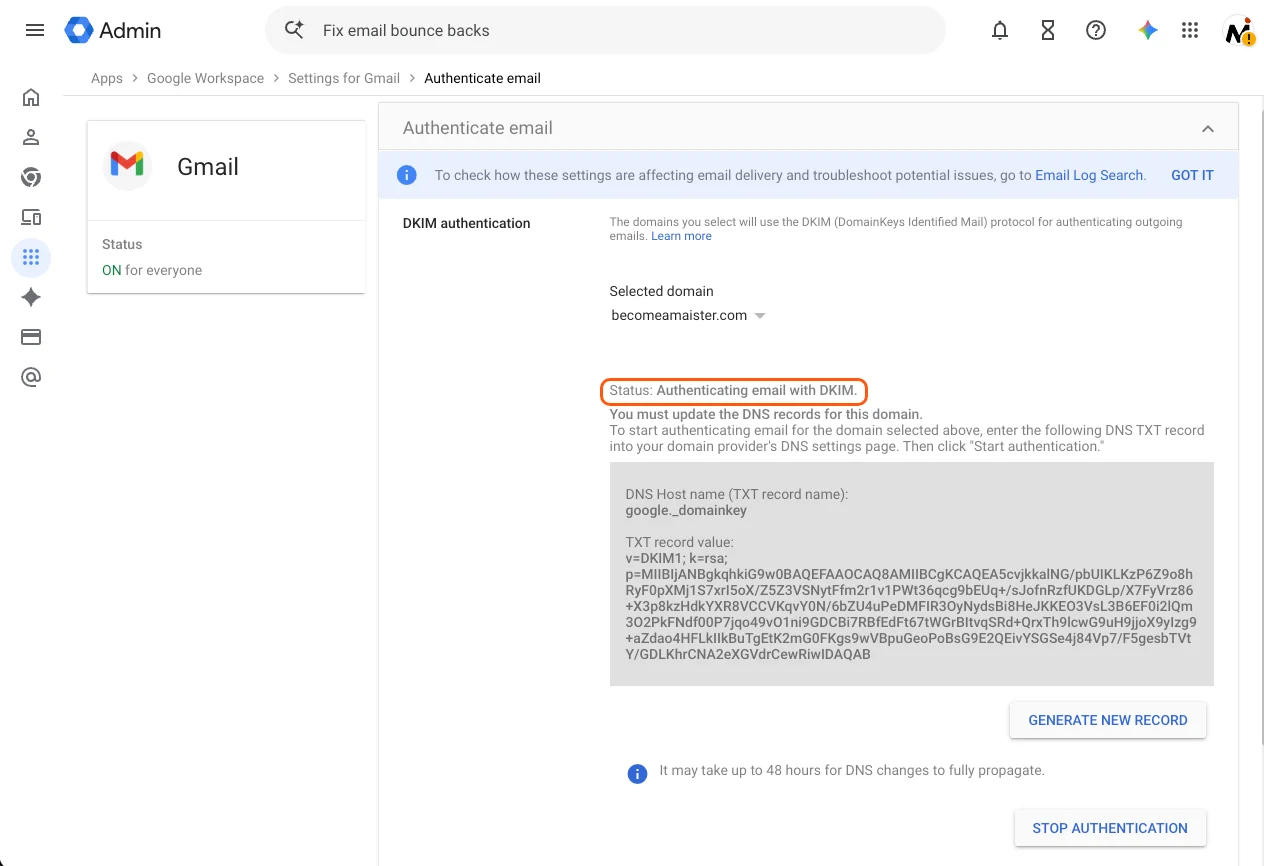
DKIM is on when the status says Authenticating email with DKIM (highlighted) and the button at the bottom says Stop authentication. - Optional: add a DMARC record. Skip this if you already have a record named
_dmarc, for example in the Email Security group. Large senders must have one. For a small business, it mainly shows email services that you have a policy, which adds a little extra trust. If you want it, add a record of type TXT, name_dmarc, datav=DMARC1; p=none. This value only reports problems and never blocks your own email. - Check that it works. Once your changes have spread, send an email from your business address to a Gmail address, such as your personal one. Open it, click the three dots next to the reply button and choose Show original. SPF and DKIM should say PASS. Reply to it, to check that your business address receives email too.
6.2Add the finishing touches
About 30 minutes
What this is for
Your website doesn’t only appear on its own pages. It appears as a small icon in a browser tab, and as a preview with an image when someone shares your link on WhatsApp or LinkedIn. That preview is often the first thing people see of your business, so it is worth designing it as carefully as the website itself. How your website shows up on Google comes in chapter 7.
By the end of this section, your website has its icon, a share preview you chose from a few designs, and a friendly page for addresses that don’t exist.
Know-how
Favicon and share image
- A favicon is the small icon next to your website’s name in a browser tab, in bookmarks and in browser history. When someone saves your website to the home screen of their phone, the same icon becomes an app icon.
- A share image, also called an OG image (after Open Graph, the technical standard behind it), is the picture that appears when someone shares a link to your website on WhatsApp, LinkedIn, Facebook or in a message. Your page title and a short description appear with it.

Without them, a browser shows a blank or generic icon, and a shared link shows plain text or a random crop from your page. Neither breaks anything, but both make a business look unfinished. With them, every tab, bookmark and shared link carries your brand, which makes you look professional before anyone has even opened your website.
Step by step
- Design your share image. In Claude Design, open the conversation with your website design, so it uses the same style, and send prompt P18.
Copy-paste prompt P18
Design my share image
What this prompt does: Claude Design creates three options for the image people see when someone shares a link to your website.
Design three options for the share image of my website: the
image that appears when someone shares a link to it on
WhatsApp, LinkedIn or in a message.

1. Make each one 1200 by 630 pixels, in the style of my
website.
2. Include my logo and one short line that says what I do.
3. Keep the text large and the design simple, so it still
works as a small preview on a phone.
4. Make the three options clearly different from each other,
and show them side by side.
- Choose one and download it. Ask for changes until one feels right. Then ask Claude Design to export it as a PNG image of 1200 by 630 pixels, download it, and save it in your website folder as
share-image.png. - Ask Claude Code for the finishing touches. Send prompt P19 with your domain filled in.
Copy-paste prompt P19
Add the finishing touches
What this prompt does: Claude Code adds your icon, your share preview and a “page not found” page, all set up for your own domain.
Add the finishing touches that decide how my website appears
outside its own pages. My domain will be [YOUR DOMAIN, FOR
EXAMPLE: STUDIOLUNA.COM].

1. Use the icon from my logo kit as the favicon, the small
icon in the browser tab, and as the app icon for when
someone saves my website to the home screen of their phone.
2. Use share-image.png as the share preview for every page,
together with the page's title and a short description.
3. Create a "page not found" page in the voice of my
website, with a link back to the homepage and to my main
action.
4. Use my domain in all of these settings, so they work once
my website moves there.
5. When you are done, publish a preview and give me the
link.
- Check the new pieces in the preview. Look for your icon in the browser tab. Then add a made-up word to the end of the preview address, such as /test, to see your “page not found” page. The share preview only works once your website is on your domain, so you check it in 6.5.
6.3Add your legal pages
About 30 minutes
What this is for
As soon as your website collects a name, an email address or a booking, privacy law applies to you in most countries. Many small businesses ignore this. Most get away with it, until a customer complains or a regulator checks. The fix takes less than an hour.
What you need depends on what your website does and where you are. This section explains the basics, but it isn’t legal advice: if you work in a regulated field, such as healthcare or finance, check with an adviser.
By the end of this section, your website has the legal pages it needs, linked from the footer of every page.
Step by step
- Find out what your website collects. A privacy policy is only correct if it lists everything your website collects, including what other services collect through it. Send prompt P20.
Copy-paste prompt P20
My privacy overview
What this prompt does: Claude Code lists what your website collects and which outside services it uses, avoids cookies where it can, and tells you whether you still need a cookie banner.
Check my website for privacy, so you can write my privacy
policy.

1. List every way my website collects personal information,
such as forms, my booking tool or email links, and what each
one collects.
2. List every service from another company that loads on my
website, such as a map, videos, my booking tool, fonts or
visitor statistics, and whether it sets cookies.
3. If my fonts load from Google or another outside service,
host them on my website instead, so no visitor information
goes to them.
4. Avoid cookies where you can without losing anything
important. For example, load a map or video only after a
visitor clicks to show it. Tell me what you changed.
5. Tell me in plain words whether my website still needs a
cookie banner, and why. Mark anything you are not sure about
instead of guessing.
6. Save the overview as privacy-overview.md in this folder.
- Ask Claude Code to write your privacy policy. Because Claude Code knows exactly what your website does, it can write a policy that fits it, without a separate tool. Send prompt P21 with your details filled in.
Copy-paste prompt P21
Write my privacy policy
What this prompt does: Claude Code writes a privacy policy based on what your website really collects, adds it to your website and marks anything you need to check.
Write the privacy policy for my website, based on privacy-overview.md
and my brief. My business details are [BUSINESS
NAME, ADDRESS, CONTACT EMAIL AND REGISTRATION NUMBER IF YOU
HAVE ONE]. My business is registered in [COUNTRY], and most
of my customers are in [COUNTRIES].

1. Cover what the law in those countries requires, in plain,
readable language that matches the voice of my website.
2. Say what I collect and why, which outside services
receive it, how long I keep it, and how people can ask to
see or delete their information.
3. Never make up facts about my business. Mark anything you
are not sure about with [CHECK], and list those points for
me at the end.
4. If my website collects sensitive information, such as
health details, tell me, and recommend that I have the
policy checked by an adviser.
5. If my country requires a legal notice, such as an
Impressum in Germany or Austria, create that page too.
6. Add the policy as a page, link it in the footer of every
page, and publish a preview.
- Read your policy and resolve every [CHECK]. Give Claude Code the missing details, and ask it to change anything that isn’t true for your business. Whenever you add a new tool to your website later, ask Claude Code to update your privacy overview and policy too.
- Add a cookie banner, only if you still need one. If your privacy overview says you do, use a provider such as Termly (free plan available) or iubenda (from about $6 a month). It blocks cookies until a visitor agrees and keeps a record of their choice, which is hard to get right yourself. It gives you a short piece of code: ask Claude Code to add it to every page.
- Check your AI image labels. If you used AI images, make sure each one still has its small label from 4.5.
6.4Final checks
About 20 minutes
What this is for
This is the last moment to catch something before your website is on your own address. Most of it you have already checked in chapter 5. This round covers what you added since, and the few things that only matter at launch.
By the end of this section, your finished website is published and ready for your domain.
Step by step
- Redirect your old pages, if you are replacing a website. Your old pages may be in people’s bookmarks and in Google’s results. A redirect sends anyone who opens an old address to the matching new page, instead of to “page not found”. Open your old website and note the address of every page, then ask Claude Code: “I’m replacing my old website. These are the addresses of its pages: [THE ADDRESSES]. Set up permanent redirects on Netlify from each one to the matching page of my new website.”
- Go through the checklist. Ask Claude Code for a new preview, open it on your phone and tick off every point.
- Every page looks right on your phone and your computer.
- If you have forms: each one has spam protection, and its messages go to your business email address.
- Your booking and contact buttons still work.
- Your email is set up as in 6.1: a test email from your business address arrives in the inbox, not in spam.
- Your icon shows in the browser tab, and your “page not found” page works.
- Your privacy policy is linked in the footer of every page, with a cookie banner and legal notice if you need them.
- If you used AI images: each one is labeled.
- If you are replacing a website: every old address leads to the right new page.
- Nothing is left from testing: no test text, placeholders or test bookings.
- Publish the finished version. Ask Claude Code: “Publish the live version of my website.” It lists the changes since your last publish and asks you to confirm.
6.5Connect your domain and go live
About 30 minutes, plus up to a day of waiting
What this is for
Your website is on Netlify, at an address such as studio-luna.netlify.app. In this section, you tell your domain to point to it, so that anyone who types your own address lands on your new website. It takes two records at your domain provider, the A and CNAME records from 6.1. This guide shows Squarespace, which manages your domain if you bought it with Google Workspace in 2.2. If your domain is with another provider, the steps are the same, in its own settings.
By the end of this section, your website is live on your own domain, with and without “www”, and with the padlock that shows it is secure.
Warning
Change only the records for your website. Your domain settings also hold the records that make your email work. Netlify may offer to take over all your domain settings, which it calls Netlify DNS. Don’t choose it, and don’t delete or change any record that mentions Google, mail or MX. If you do, your email can stop working.
Step by step
- Add your domain in Netlify. In Netlify, open your project and click Domain management in the menu on the left. Click Add a domain, then Add a domain you already own.
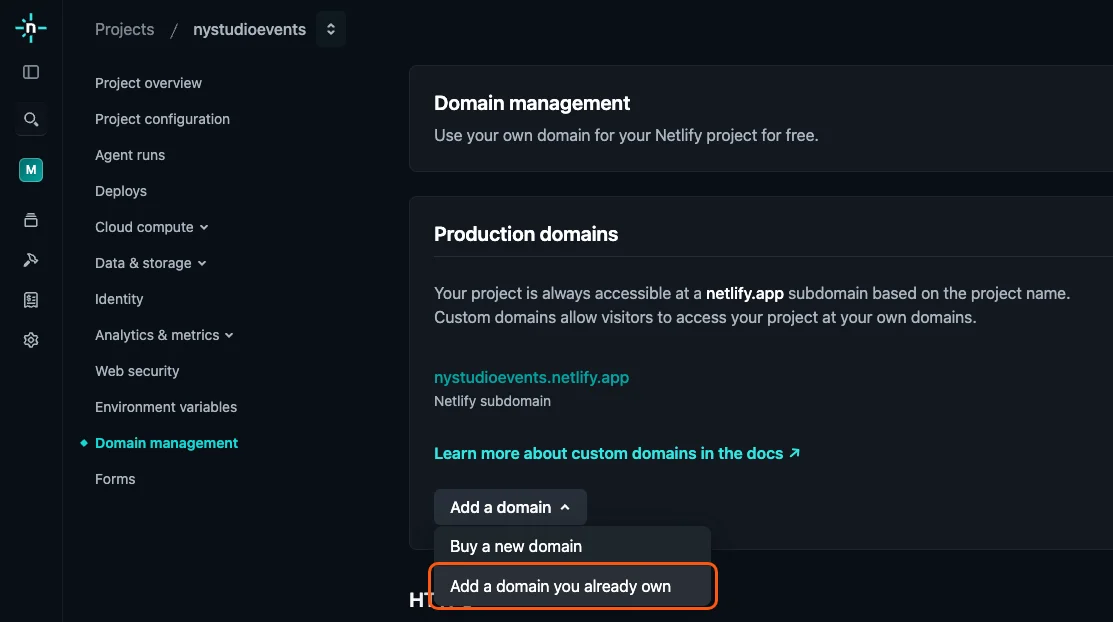
Your Netlify address is listed here too, under Production domains. You need it in step 4. Type your domain without “www”, such as studioluna.com. When Netlify says it has found it, click Add domain. Netlify adds the www version by itself. If Netlify then offers to set up Netlify DNS, skip it, as the warning above explains.
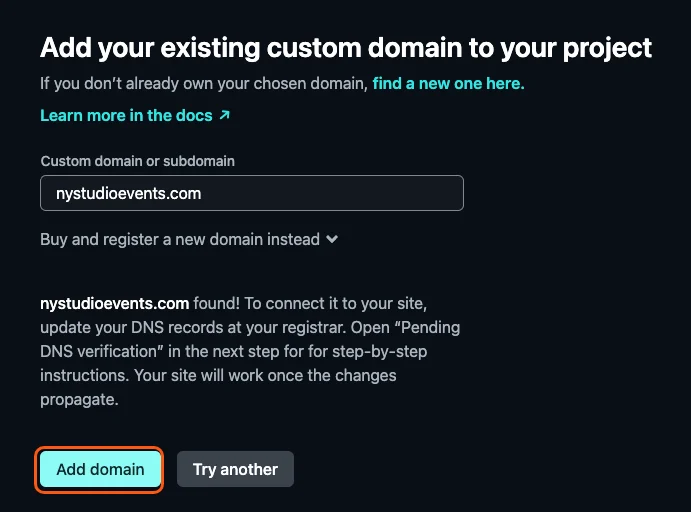
Netlify mentions opening “Pending DNS verification”. You don’t need to: steps 2 to 4 give you everything. - Open your domain settings. If you bought your domain with Google Workspace, Squarespace manages it:
- Go to account.squarespace.com/domains and sign in with your business email address. If Squarespace offers Continue with Google, try that first. If it doesn’t work, type your business email address and use Forgot password to set a password.
- Click your domain, then DNS in the side panel, then DNS Settings.
If you can’t sign in, go to admin.google.com instead, open the menu and click Account, Domains and Manage domains. Next to your domain, click View details, then Advanced DNS settings: Google shows your sign-in details and a link to Squarespace. If your domain is with another provider, sign in there and open its DNS settings instead.
- Remove what is in the way. Your domain can only point to one website. If you see a group called Squarespace Defaults at the top of the page, it points your domain to a Squarespace page. Click the red trash can next to its name and confirm, to delete the whole group. Then look under Custom records for an A record with the name @, or a CNAME record with the name www, for example pointing to your old website, and delete those the same way. Leave every other record and group alone, especially anything for Google or email, such as Domain Connect to Entri, Google Workspace or Email Security.
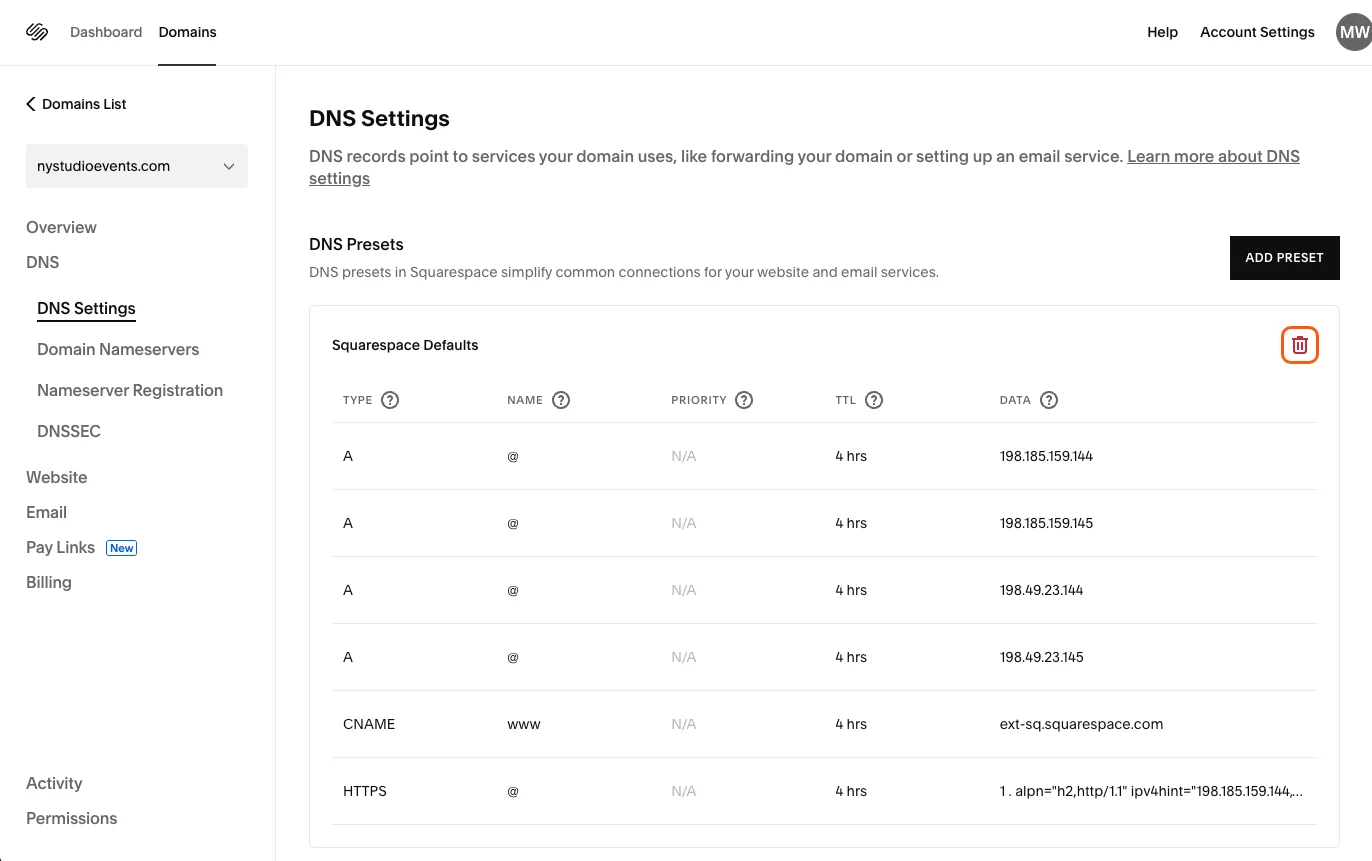
The DNS Settings page in Squarespace. Delete the Squarespace Defaults group with the trash can next to its name (highlighted). - Add your two website records. Under Custom records, click Add record. Squarespace first asks for a verification code, which it sends you, usually by email: enter it and click Continue. Then add the first record, click Save, then do the same for the second:
- Type A, name
@, IP address75.2.60.5 - Type CNAME, name
www, data your Netlify address, such asstudio-luna.netlify.app
Leave priority and TTL as they are. Type the values exactly: one wrong digit and your website won’t be found. You find your Netlify address in Netlify’s Domain management, under Production domains, as in step 1.
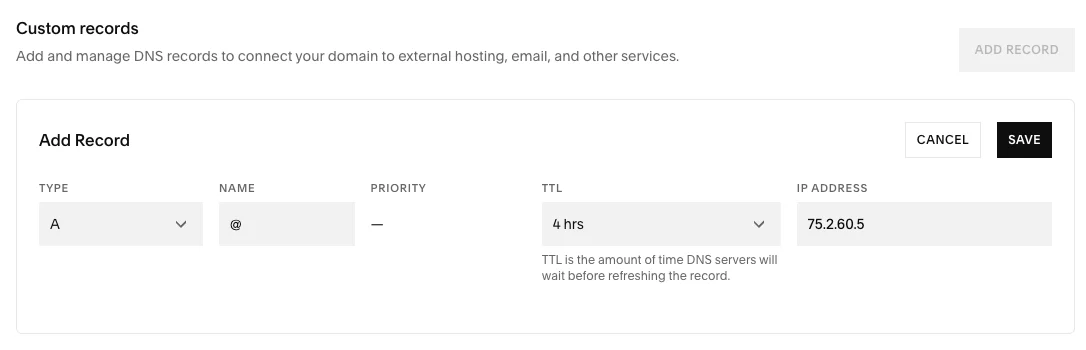
The A record, ready to save. With type A, the last field is called IP address. 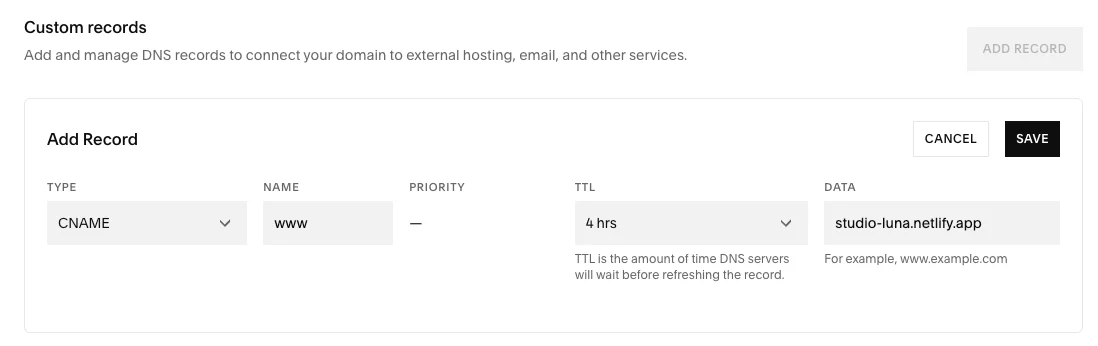
The www record, ready to save. - Type A, name
- Wait for the padlock. Back in Netlify’s Domain management, both versions of your domain show Pending DNS verification until the change has spread. That is normal, and you don’t need to click it. Once it works, the message disappears and Netlify adds the padlock, the secure connection, by itself. This usually takes less than an hour, sometimes up to a day.
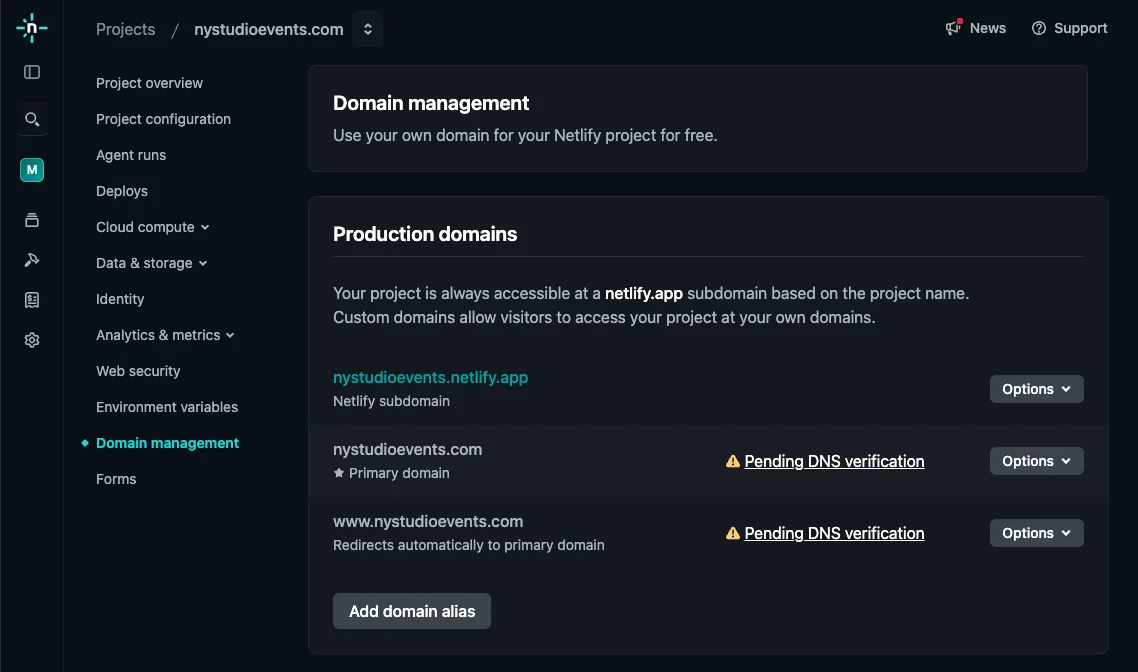
Your domain and its www version, waiting for the change to spread. - Check it from your phone, off your own wifi. Switch to mobile data, so you see what everyone else sees. Open your domain with and without “www”, and check for the padlock. Send yourself a message through your form. Then share your homepage link with yourself on WhatsApp to check the share preview.
- If you replaced a website, keep the old one for a week. Cancel your old hosting only once your new website has worked for a week, in case you need anything from it.
Netlify may also recommend making the “www” version of your address your primary domain, so every visitor is sent to it. That makes your website slightly faster for visitors far away, but for most local businesses the difference is too small to notice. If you prefer it, open Domain management, click Options next to the www version, and set it as primary. Otherwise, leave it as it is: both addresses work either way.
Your website is live. Type your domain into any browser, anywhere in the world, and there it is: designed, written and built by you, with a little help.
In chapter 7, you make sure people can find it.
You did it!
Sources, checked October 2026. Connecting a domain to Netlify: Netlify docs. DNS records at Squarespace: Squarespace Help Center. Reaching your domain settings from Google Workspace: Google Workspace Admin Help. Google Workspace email records: MX and DKIM. Keeping Google Workspace email working: Google Workspace Admin Help. Cookie banner providers: Termly and iubenda.